Table of Contents
上传 ISO
从 NixOS官网 获取 最小化安装镜像(Minimal ISO image)的下载地址

在 Vultr 的上传页面,粘贴刚刚获取的地址,点击上传

Vultr 需要 5~10 分钟完成镜像下载,这个页面 可以看到下载进度,下载完成后有 MD5值供你验证完整性
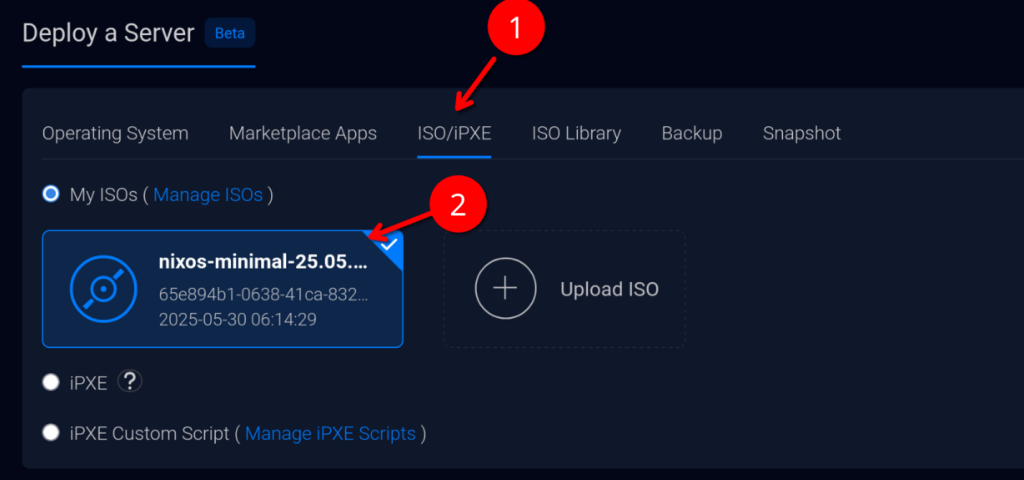
使用自定义镜像部署服务器
部署的时候选择刚刚上传的 ISO 即可

SSH 连接
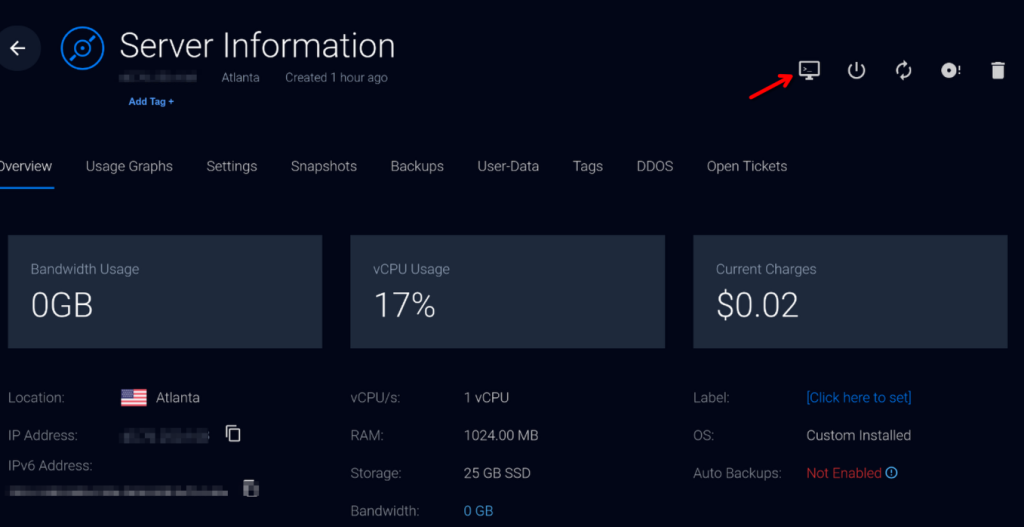
第一次需要通过WEB UI 上提供的终端来访问

设置密码(这只是 LiveCD 的密码,方便 SSH连接,重启后失效)
# set "nixos" password
passwd

# set "root" password
sudo passwd现在你可以从本地 SSH 客户端连接服务器了
分区
# login as root
sudo -i

# create a MBR partition table
parted /dev/vda -- mklabel msdos

# create root partition
parted /dev/vda -- mkpart primary 1MB -2GB

# Set the root partition’s boot flag to on. This allows the disk to be booted from.
parted /dev/vda -- set 1 boot on

# create swap partition
parted /dev/vda -- mkpart primary linux-swap -2GB 100%

# format
mkfs.ext4 -L nixos /dev/vda1
mkswap -L swap /dev/vda2
```⚠️ 记得用 lsblk -f 确认你的磁盘名
⚠️ 我尝试过 UEFI(GPT),Vultr 似乎不支持
安装
# mount root
mount /dev/disk/by-label/nixos /mnt

# enable swap now
swapon /dev/vda2

# generate an initial configuration file
nixos-generate-config --root /mnt --flake

# config your system
vim /mnt/etc/nixos/configuration.nix

# install
nixos-install --flake '/mnt/etc/nixos#server'

# As the last step, `nixos-install` will ask you to set the password for the `root` user, e.g.

# set password for other user
nixos-enter --root /mnt -c 'passwd glaumar'参考配置
nixos-generate-config 生成的配置文件不要直接用,特别是启动的磁盘路径( boot.loader.grub.device)一定不要错,下面提供一份基本的可起动配置做参考(configuration.nix),这个配置开启了 SSH服务(没开防火墙),并添加了一个名为 “glaumar”的用户
# Edit this configuration file to define what should be installed on
# your system. Help is available in the configuration.nix(5) man page, on
# https://search.nixos.org/options and in the NixOS manual (`nixos-help`).

{ config, lib, pkgs, ... }:

{
  imports =
    [ # Include the results of the hardware scan.
      ./hardware-configuration.nix
    ];

  # Use the GRUB 2 boot loader.
  boot.loader.grub.enable = true;
  # boot.loader.grub.efiSupport = true;
  # boot.loader.grub.efiInstallAsRemovable = true;
  # boot.loader.efi.efiSysMountPoint = "/boot/efi";
  # Define on which hard drive you want to install Grub.
  boot.loader.grub.device = "/dev/vda"; # or "nodev" for efi only

  networking.hostName = "nixos_server"; # Define your hostname.
  # networking.networkmanager.enable = true;  # Easiest to use and most distros use this by default.

  time.timeZone = "Asia/Shanghai";

  i18n.defaultLocale = "en_US.UTF-8";
  i18n.extraLocaleSettings = {
    LC_ADDRESS = "en_US.UTF-8";
    LC_IDENTIFICATION = "en_US.UTF-8";
    LC_MEASUREMENT = "en_US.UTF-8";
    LC_MONETARY = "en_US.UTF-8";
    LC_NAME = "en_US.UTF-8";
    LC_NUMERIC = "en_US.UTF-8";
    LC_PAPER = "en_US.UTF-8";
    LC_TELEPHONE = "en_US.UTF-8";
    LC_TIME = "en_US.UTF-8";
  };


  # console = {
  #   font = "Lat2-Terminus16";
  #   keyMap = "us";
  #   useXkbConfig = true; # use xkb.options in tty.
  # };


  # Define a user account. Don't forget to set a password with ‘passwd’.
  users.users.glaumar = {
    isNormalUser = true;
    extraGroups = [ "wheel" ]; # Enable ‘sudo’ for the user.
    packages = with pkgs; [
      tree
    ];
  };


  # flakes and new nix command
  nix.settings.experimental-features = [ "nix-command" "flakes" ];

  # Allow unfree packages
  nixpkgs.config.allowUnfree = true;

  # List packages installed in system profile.
  environment.systemPackages = with pkgs; [
    wget
    curl
  ];

  programs.git = {
    enable = true;
    lfs.enable = true;
  };


  programs.neovim = {
    enable = true;
    defaultEditor = true;
  };


  # List services that you want to enable:

  # Enable the OpenSSH daemon.
  services.openssh.enable = true;


  # Open ports in the firewall.
  # networking.firewall.allowedTCPPorts = [ ... ];
  # networking.firewall.allowedUDPPorts = [ ... ];
  # Or disable the firewall altogether.
  # networking.firewall.enable = false;

  # Copy the NixOS configuration file and link it from the resulting system
  # (/run/current-system/configuration.nix). This is useful in case you
  # accidentally delete configuration.nix.
  # system.copySystemConfiguration = true;

  # This option defines the first version of NixOS you have installed on this particular machine,
  # and is used to maintain compatibility with application data (e.g. databases) created on older NixOS versions.
  #
  # Most users should NEVER change this value after the initial install, for any reason,
  # even if you've upgraded your system to a new NixOS release.
  #
  # This value does NOT affect the Nixpkgs version your packages and OS are pulled from,
  # so changing it will NOT upgrade your system - see https://nixos.org/manual/nixos/stable/#sec-upgrading for how
  # to actually do that.
  #
  # This value being lower than the current NixOS release does NOT mean your system is
  # out of date, out of support, or vulnerable.
  #
  # Do NOT change this value unless you have manually inspected all the changes it would make to your configuration,
  # and migrated your data accordingly.
  #
  # For more information, see `man configuration.nix` or https://nixos.org/manual/nixos/stable/options#opt-system.stateVersion .
  system.stateVersion = "25.05"; # Did you read the comment?

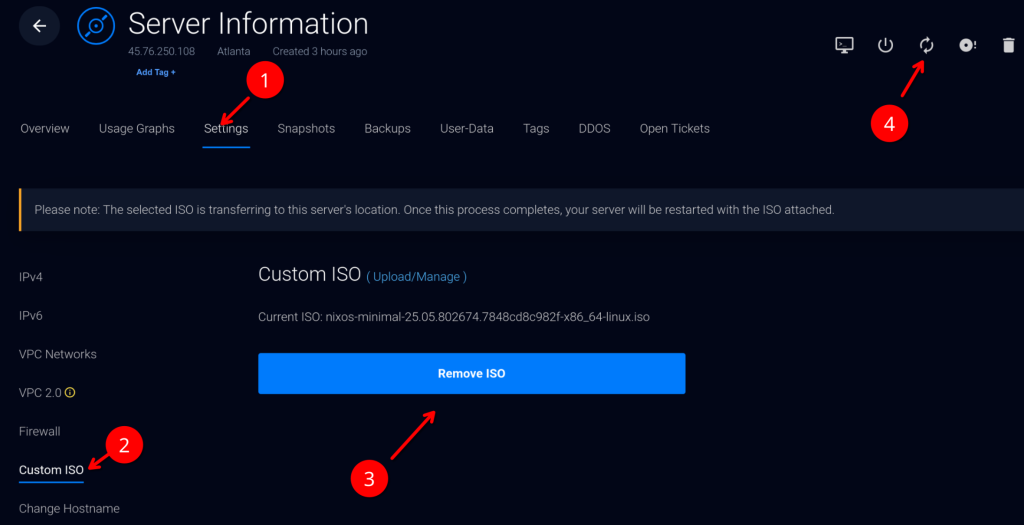
}移除 ISO 并重启

顺利的话,重启后你可以使用 SSH 连接以 glaumar 用户名登录
